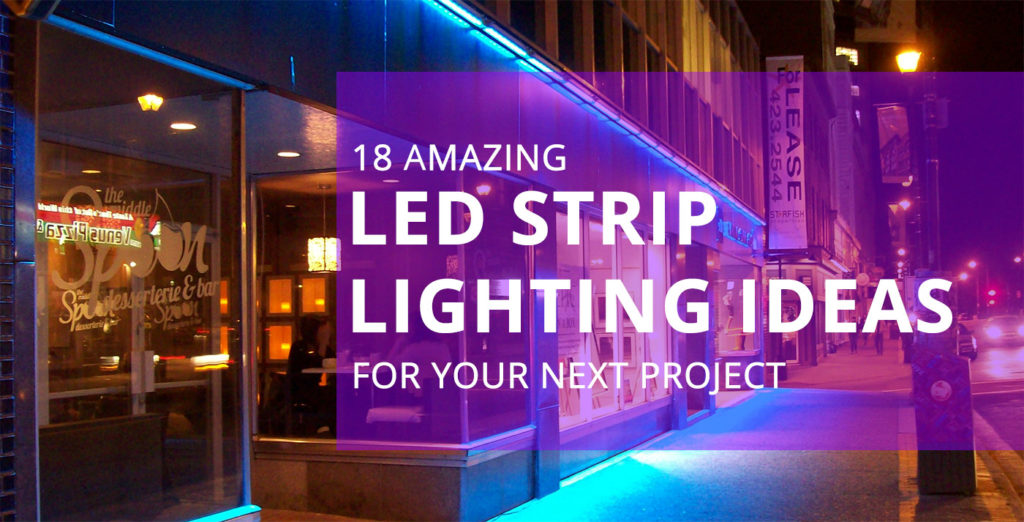
Mastering LED Strip Lighting Tips & Techniques
People buy LED strip lighting for three main reasons:
First, they provide an cost efficient alternative compared to traditional light bulbs.
Second, traditional lighting cannot fit in some applications – such as tight spacing.
Third, they look freakin’ awesome!
But you’re wondering:
“How do I find creative methods of applying these cool LED strip lights”
Well today is your lucky day.
All you need is about 10 minutes of your day to check out these 18 led lighting ideas that you can use for your next project.
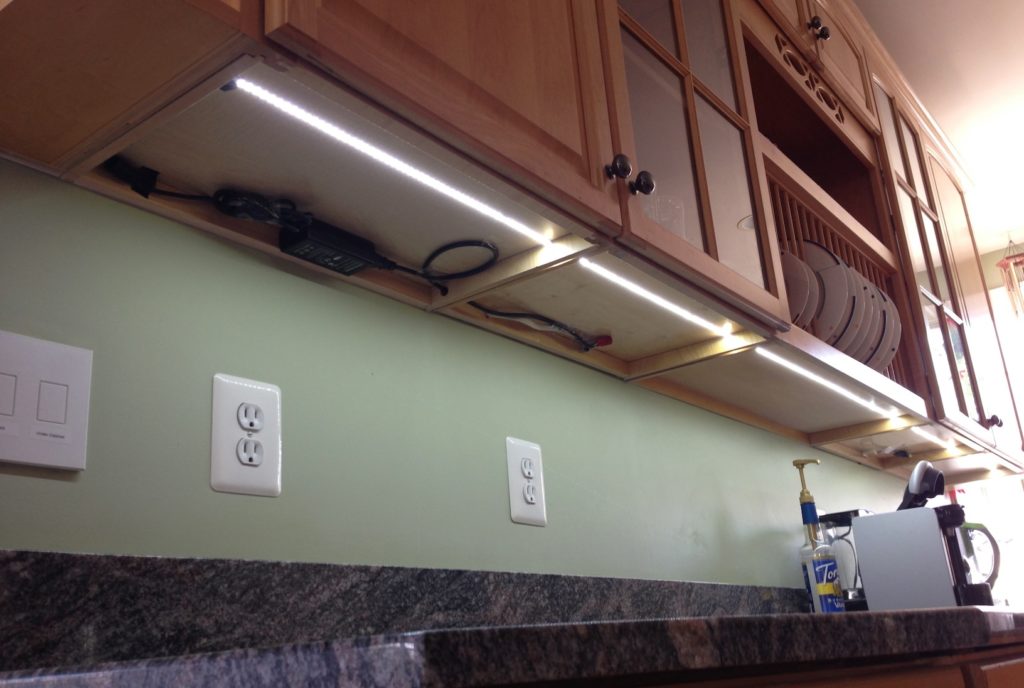
1. Under Cabinet Lighting For Your Gorgeous Kitchen
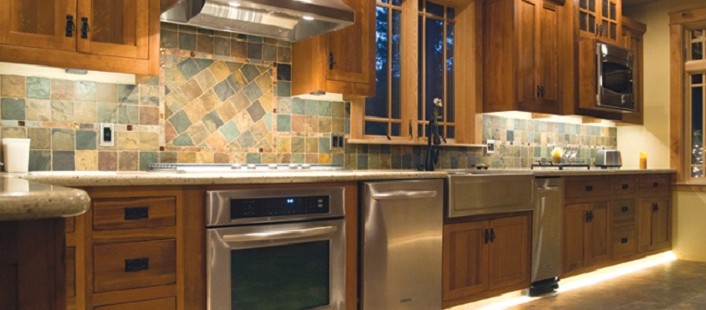
Image Source: Inhabitat
Most people spend a lot of time in the kitchen…
- Preparing meals for their family
- Luncheons
- Midnight raids
- Sleep walkers making a ham sandwich (guilty as charged!)
There’s one problem though: your light bill can get expensive! Do you agree?
Of course, that is if you’re using traditional light bulbs.
The U.S. Department of Energy estimates that by 2027, LEDs will save more than $30 billion dollars. That’s a ton of money.
This chart shows the cost to operate each type of bulb over a 25,000 hour lifespan.
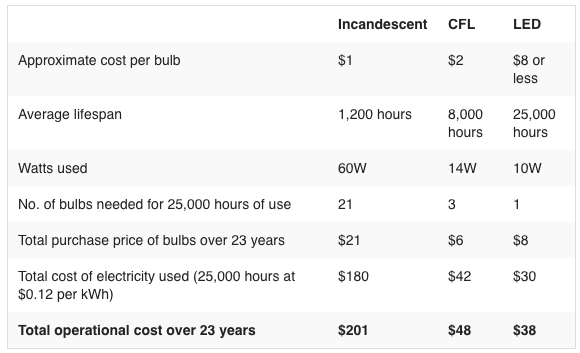
As you can see, LED lights is the best method and beats traditional lighting in every aspect:
- Average lifespan
- Watts used
- Total operational cost longterm
- Average cost of bulbs over long period
Setting up LED lighting in your kitchen is a pretty simple task. You can do it in 5 simple steps.
Here’s How:
Step 1: What type of lighting do you need?
- Single density lights (little bit of light)
- Dual density lights (more light)
- Color changing lights
Step 2: Where do you want to install it?
- Under the cabinet
- Over the cabinet
- In the cabinet
Tip: Make sure to keep an eye out for the electrical outlet!
Step 3: Power Adapters
Make sure to use the correct power adapter to convert your LED lights to 12V DC. You never want to plug in LED lights directly into your outlet.
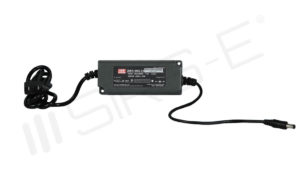
LED-PS12V-60W-UL
Step 4: Accessories
You’ll need a DC plug to connect the strip lights to the power adapter.
Don’t forget these other types of accessories to go with your LED strip lights:
- Toggle switches
- Dimmer switches
- Motion sensors
- Extension cables
Step 5: Install it
You may be wondering what to do with the right components.
You can begin installing and getting everything setup.
The low-profile design makes it easy to be invisible since wherever you choose to install it.
You can use 3M adhesive to install the application. Since the length is customizable, you are able to cut the LED strip to the exact measurements needed.
Buy Online: White LED Strip 5050 SIRS-E 16.4 Feet 60 LED Meter
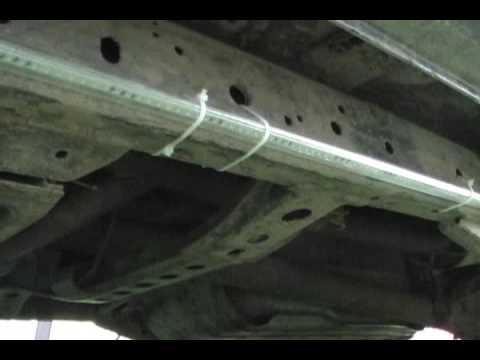
2. LED Light Strips for Trucks
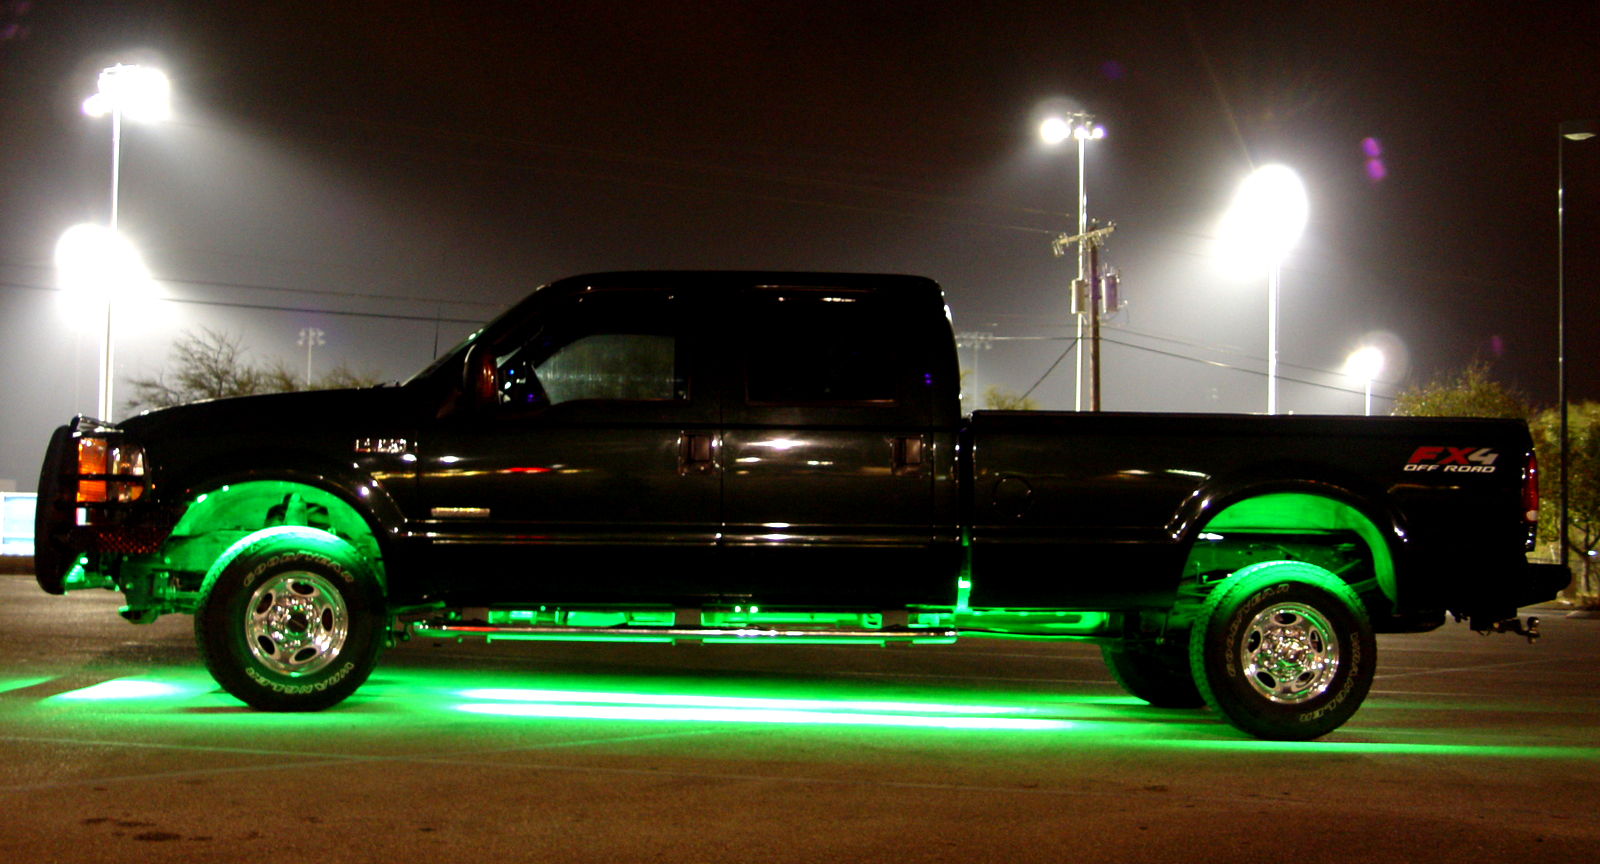 Image Source: Custom Dynamics
Owning a nice big truck is something almost every man wants to enjoy. Being able to sit up high while driving around the city enables the power within to come out.
What stands out though, is having some awesome LED lights to show off your truck.
How do you do that? Well I’m glad you asked!
There are plenty of other ways that you can have your truck standout when it comes to lighting – such as:
- LED Light Bars
- LED Truck Bed Lights
- LED Truck Headlights
- LED Tail Lights
- LED Truck Cab Lights
Many years ago, StreetGlow was the leader in the industry when it came to modifying your cars and trucks by providing undercar kits and other accessories.
Now with things being more versatile and available, the possibilities are endless!
Installing a LED undercar kit for your Truck isn’t difficult. You don’t need a professional to install it – although it would help if you were to run into any issues.
Utilizing flexible LED light strips you can achieve the same look on your truck or car.
LED strips produce an enormous amount of light. They can be tucked underneath the frame of the truck and the fenders.
You can even place them on the edges of the bed of the truck or dashboard – wherever you feel the need. Use some 3M adhesive, a bit of wiring knowledge and you’re good to go.
Here’s how you can add some custom lights to your ride – whether it’s a truck or even a car:
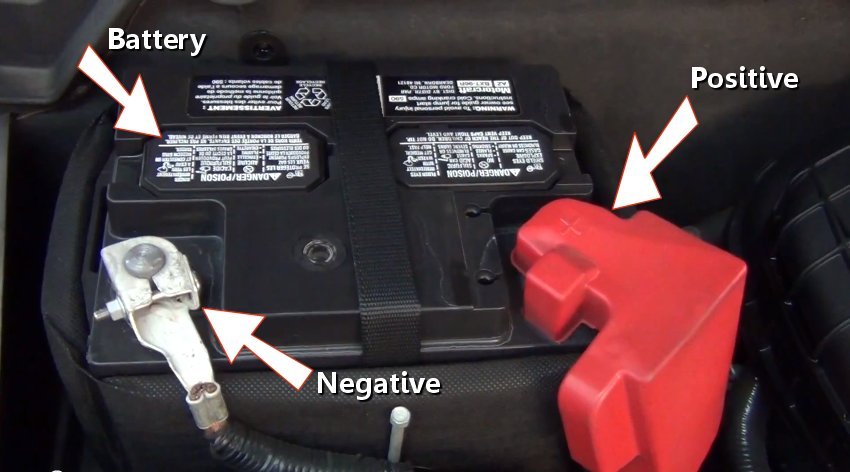
Step 1: Disconnect negative battery terminal
STOP!
Before doing any work on your vehicle, you will want to do something important.
Go ahead and disconnect the negative battery terminal.
Then you can thank me :)
You always want to stay safe when working on your car. Safety first!
Step 2: Check under your car
See underneath of your vehicle. Look for a secure spot for LED strips from your engine bay to the underside of your car.
If you are using LED light strips with adhesive then you need is a smooth surface.
If you prefer not to use the adhesive, you can look for bolts or brackets. Once you’ve done that, secure the LED lights using zip ties.
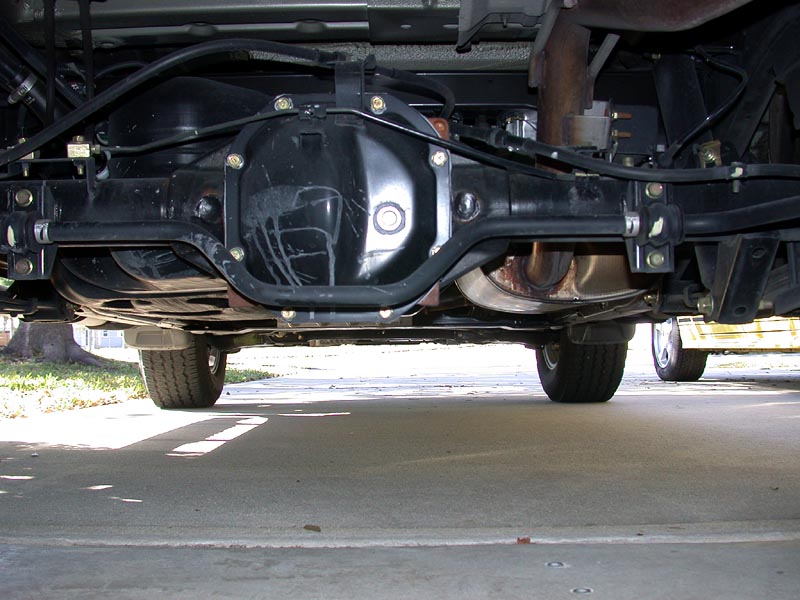
Image Source: Xterra Owners Club
Step 3: Remove dirt
Use a washcloth to remove any dirt on the place you want to install the LED strip lights.
Cleaning the surface is necessary to assure that the LED strip lights will stick.
If you’re not using adhesive, cleaning is necessary. Otherwise your LED lights will not be able to stick with the dirt.

Image Source: Temecula Subaru
Step 4: Install the LED strip lights
There are different kinds of LED strip lights built with its own button switch like this product from Superbrightleds.
This flexible LED light strip is weatherproof and has a lifetime of 30,000 hours. Carefully line the LED lights wherever you want it.
You can directly apply it and stick it to the spot with its built-in adhesive. Otherwise, use a zip tie every 12 inches to secure the LED light strips.
Buy Online: RGB LED Strip Submersible IP68 5050 SIRS-E High Quality 30 LED Meter
3. Marine LED Lighting
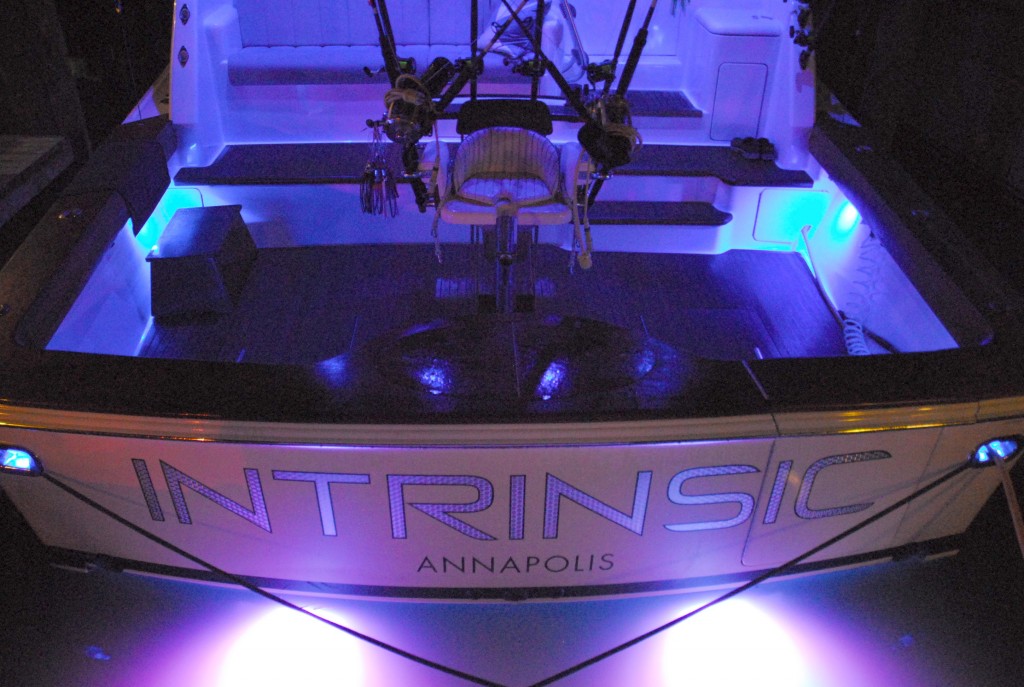
Image Source: Intrinsic Yacht & Ship
If you want to make your boat look fun, upgrade your custom boat lighting and add LED lights.
Not only do the upgrades make it look better, but it also helps you save money and energy.
If you’re looking for fun or functional – you will increase enjoyment that you get from your boat.
When it comes to the marine, there are many types of LED upgrades that you can do such as:
- Underwater lights
- RGB Rope Lighting
- Accent lighting
- Compartment Lighting
- LED Engine Room Lights
- And much more!
Here are the steps you can follow when you want to install your own marine LED light.
Step 1: Choose the kind of LED light
There are a variety of LED lights you can use for your boat such as underwater lights, rope lighting, accent lighting, compartment lighting and a lot more. The first step is to decide the kind of light you want and its corresponding brightness.
The higher the lumens rating of the LED lighting, the brighter it is.
Step 2: Pick a location
After choosing the type of lighting you want, the next step is to pick a location. Make sure that if you are putting LED lights on a spot where it can be exposed to water or sand, you have to choose the waterproof LED light strips.
If you are installing lights away from water, waterproofing is not required.
Step 3: Pick the type of LED light
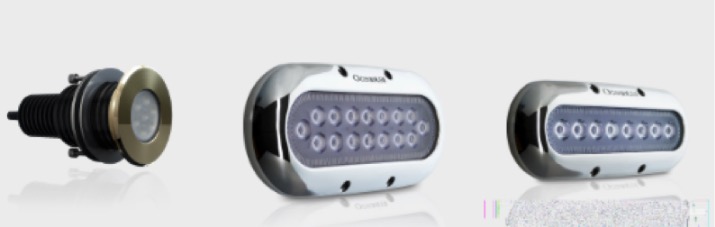
There are various lights made for your boat or yacht.
Oceanled offers different kinds of LED lighting for your boat or yacht such as underwater lighting, dock lighting, exterior lighting and a lot more.
Step 4: Install the LED lights
Most marine LED lights come with its own installation kit. Each installation kit includes a fuse kit that is recommended to be installed with each light.
The ideal depth for underwater LED installation is about 8-10” from the top of the fixture. After installation, it is recommended to apply anti-fouling paint on the LED lens.
You can mount the lights anywhere on your boat.
Buy Online: RGB LED Strip Submersible IP68 5050 SIRS-E High Quality 60 LED Meter
4. Motorcycle LED Lights
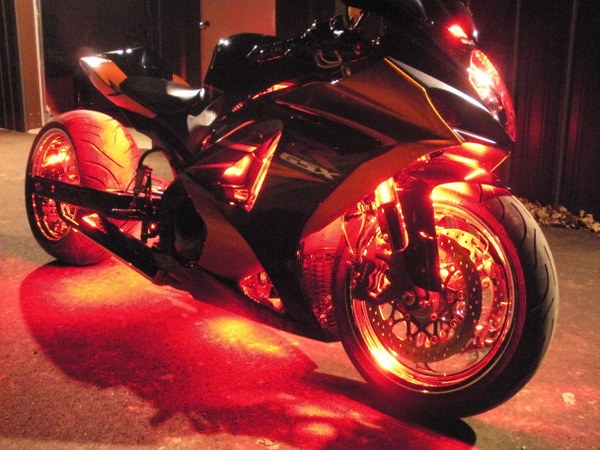
Image Source: Cycle Concepts
Nothing beats tricking out your ride like adding some custom lighting to your motorcycle.
It doesn’t matter what type of ride you have, you will stand out at bike shows, on the street and with your friends.
Adding light accessories to your motorcycle is becoming the new trend nowadays. Thanks to the invention of LED lighting, adding colors to your ride has become a lot easier.
Because of the small size of LED lights, it is easy to attach the lights onto a strip of circuit board. In effect, you have a LED light strip that can be mounted on the sides of your motorcycle.
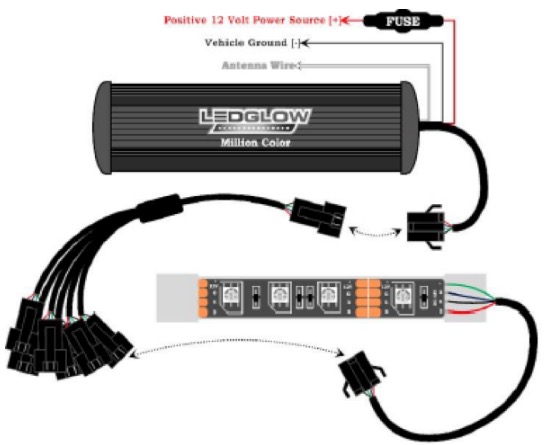
LEDGlow offers different kinds of motorcycle LED light kits: Single Color, Multi Color, Like Trike Million Color LED kits and motorcycle headlight accessories.
Here is where you can add some custom lighting with LED strips in your motorcycle:
- Rear Fender Frame Rail
- Front Oil Tank
- Rear Oil Tank
- Triple Trees
- Lower Frame Rail
- Lower Swing Arm
- Air Filter
- Forks
- Under Gas Tank
- Center Trans Opening
- Upper Fairing Opening
- Radiator Opening
- Under Seat
Step 1: Remove battery
Disconnect the batter of your motorcycle for safety purposes. It is usually located underneath the seat.
Step 2: Choose the LED light strips
Choose the kind of LED light strips you want for your motorcycle.The kinds of LED lights depend on the brightness and color you want to achieve.
The more LED color lights you have the brighter is the effect.
Like Trike Million Color LED kits have 15 solid colors made for larger bikes. Single Color Motorcycle LED kits add single color illumination with lighting effects.
Each LED light kit contains the following:
- variety of lighting strip lengths
- a control box with different color modes
- flashing mode
- fading mode
- a wireless remote.
Step 3: Install the LED lighting kit
Each LED motorcycle lighting kit comes with installation instructions. Before installing to your motorcycle, you need to test if the LED lights are working properly by connecting all the strips into the wiring harness then to the control box.
After this, connect the red wire to the positive terminal and the black wire to the negative terminal of the battery.
After testing, layout the LED lights before finalizing the installation. Make sure to keep the LED lights away from any moving part or heat source of the motorcycle.
Clean the mounting surfaces with alcohol before using the adhesive tape. Secure the control box in a dry place.
Finally, connect again the LED lighting kit to the battery source.
Buy Online: RGBW LED Strip Submersible IP68 4 in 1 Neutral White SIRS-E A Grade High Quality
5. LED Building Lighting – Light Up Your City
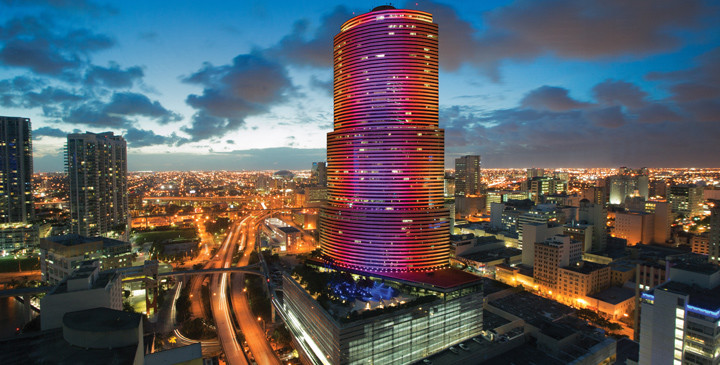
Image Source: LED Source
Nothing shows your pride more with your community than displaying customized light shows. That’s exactly what the iconic Miami Tower, a 47-story office building in the heart of downtown Miami did. This is a building that’s famous for its color-changing lighting scheme and has been featured in many movies and TV shows.
The reality of reinventing a city skyline with almost unlimited color possibilities is here.
Architectural LED lighting wasn’t possible in the past, but that has all changed. LED lighting can bring color and life to a dull city skyline.
Because of the small size of LED lights, it is possible to put together thousands of LED lights. Aside from that, LED is very energy efficient.
Compared to other bulbs, it consumes 90% less power.
There is a less chance of overheating compared to using other types of bulb.
They offer LED lights specifically made for architecture. They offer Pixel Solutions and ENTTEC LED strips with varying brightness and colors.
Here are the steps to have an architectural LED lighting.
Step 1: Choose a building to design
To add color and lights at night, you can design a building using LED lights. The first thing to do is choose a building you would want to design. It would be better if the building is a famous landmark. If not, choose a tall building that would stand out among the others.
Step 2: Draft a design
The most difficult part when putting LED lights on buildings is the design of the lighting. It is not as easy as a straight strip of light. A common design in architectural lighting is by outlining the building. You can also experiment and take some risks. You should also choose the color lighting. There are LED lights that change colors.
Step 3: Estimate the materials needed
Since most architectural lighting involves a large amount of LED light strips, you should estimate all you need before the actual installation such as connectors, power source, fuse box and others.
Step 4: Installation of the LED light strips
Since you are installing the lights in a building, you will need people to do the job for you. Let them know the design you want to achieve
Step 5: Hire an electrician
Architectural lighting is a big scaled LED lighting. To ensure safety, it is best to hire a professional electrician that will take care of the connections and wires of your LED lights.
Buy Online: DMX LED Strip 34 Pixel/m RGB SIRS-E PixelDMX Controlled
6. Home Interior LED Accent Lighting
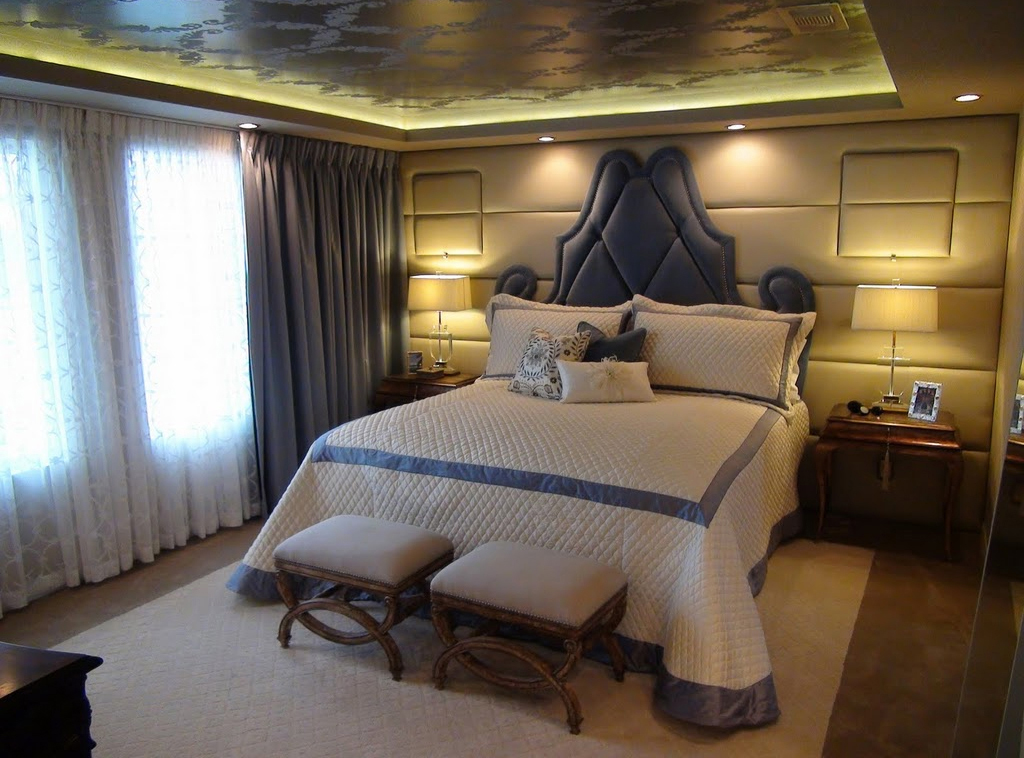
Image Source: Lamps Plus
Nothing is more warming than getting ready to sleep in a tranquil room. Giving your bedroom, or living space, a soft white color will let the beauty of the decor shine through.
LED light offers a variety of lighting options that will suit any part of your home.
Aside from the aesthetics, LED lights are the best option when it comes to lighting because of its advantages:
- Longer lifespan
- Uses less power compared to other bulbs
- Small bulbs can be installed almost anywhere
- Highly efficient
Here are some ideas where you can add accent LED lighting to your home:
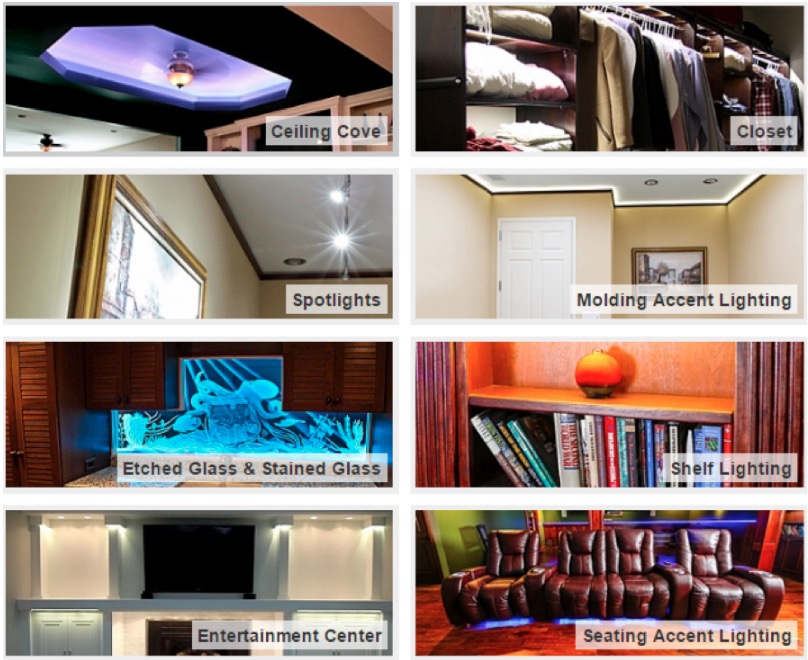
Image Source: Super Bright LEDs
Step 1: Choose a design you want to achieve
There are many LED lighting ideas from the internet. To have a concrete idea of what to install, it would be easier to have model room you want to copy.
Check the internet for various bedroom LED lighting ideas.
Step 2: Note the LED accent lights you will need
There are many options for home LED accent lighting.
- LED globe bulbs
- LED spot bulbs
- LED recessed lights
- LED bi-pin bulbs
- LED strip lights and a lot more
Each LED light has its own effect and purpose. Accent LED lights are installed to give emphasis on particular parts of your home.
This kind of lighting usually improves the overall ambiance.
LED accent lights are not made for utility but more for aesthetical value. Consult your interior designer to help you decide the right accent lighting for your home.
Step 3: Installation
Installing LED lights is very easy.
If you are wiring strips, you can opt for a wireless soldering connector that can be directly connected to the power source or ready-made LED light strip kits.
Other LED accent lighting such as globe lights, recessed lights, or bi-pin bulbs can be installed directly to your current light fixtures. If you want to change the wiring and lighting fixtures, it is best to contact an electrician to help you.
Buy Online: Warm White LED Strip 5050 SIRS-E 16.4 Feet 30 LED Meter
7. LED Light Strips for Golf Carts
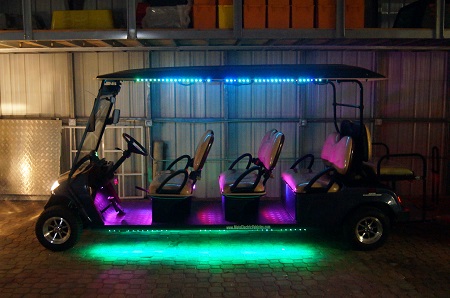
Image Source: Moto Electric Vehicles
Whether you go golfing, or just like having a golf cart to drive around in – adding LED lights will definitely catch other people’s attention. You will also have no problems identifying your golf cart.
At a single glance, plus the colors will add some character and fun to your cart.
You can have a steady stream of lights, flashing lights, multiple patterns and even strobes and flashing effects. Let your imagination run wild with this project.
Check out other examples from the internet to give you inspiration regarding the lights you will need for your golf cart. These are all possible because we LED lights.
The use of LED lights is continue to expand because of its flexibility as a light bulb. The small size of the bulb makes it plausible to install LED lights into practically anything.
The easy part is that there are LED light kits that are sold from the internet by companies such as LEDGlow.
You do not have to worry what to buy because each package has everything you need to successfully install your own LED light strips to your golf cart.
Step 1: Choose the color and effect you want
Check out the products available. Choose the brightness, effects and color you want.
There are single golf cart LED and multiple golf cart LED lighting kits in different vibrant colors. Most LED golf cart lighting as strobe, fading and sound activated pattern effects.
Each kit already includes the LED strip lights, control kit, and fuse kit.
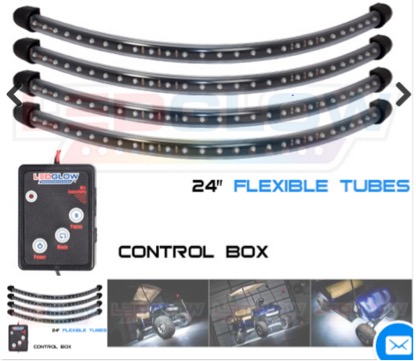
Image Source: LED Under Body
Step 2: Follow the instructions for installation
The LED strip lighting kits already includes everything you need except for the power source.
Before installing the lights, remove the battery of your golf cart for safety.
Just layout the LED lighting to your desired location. If you are sure, you can start mount the strips using its built-in adhesive or add additional security with LED light curable epoxy adhesives.
After installation, connect the LED lights to the battery of your golf cart.
If you want, you can use a golf cart voltage reducer that will enable you to install the 12v LED lighting to any 15-60v battery.
Step 3: Double check the connections
Make sure that the positive and negative terminals of your LED light strips match those of the power source. The voltage of the LED and source should also be the same.
It is also important to install the LED lights in places where there is no moving or possible heat source.
Buy Online: RGB LED Strip Submersible IP68 5050 SIRS-E High Quality 30 LED Meter
8. Aquarium LED Lighting DIY
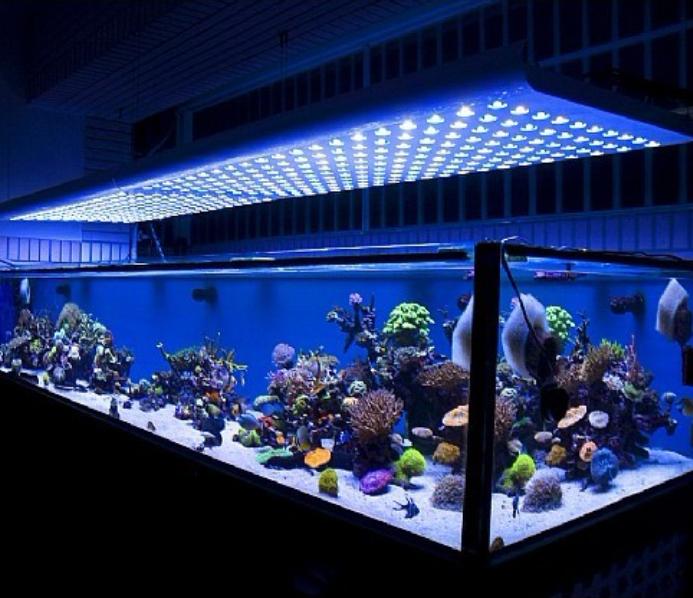
Image Source: L Spaces
In many cultures around the world, having fish in the home is a sign of good fortune and luck. Having you own aquarium can help in reducing stress.
To make your aquarium more appealable, you can install aquarium LED lighting. LED lights use low energy.
It has varying brightness that is safe for the fish. If you want bright lights, check the lumens of your LED light and choose the one with the higher lumen value.
You can use aquarium LED lighting for freshwater and saltwater marine reef aquariums.
For underwater installations, the waterproof type of LED lighting is required. Even though you are using waterproof LED lights, it does not mean you can soak the lights on water.
The LED circuit will eventually be damaged if exposed to water for a long time.
Because of the power saving advantage of LED lights, it is used dynamically in different applications. These are the steps on how to install LED lights as aquarium lighting.
Step 1: Decide where to place your LED lights
Find a place where you can accentuate your aquarium and the same time prevent the lights from getting wet.
You can choose between setting it up on top of the aquarium or on the bottom for added effect.
You can also install both lights if you like.
Step 2: Choose the LED light strips
There are many LED lighting kits you can purchase from the Internet. Choose the colors you want.
Mixing different colors can give a nice effect to your aquarium. You can also opt for a plain white light for a clean look.
The kits are already complete with connectors, switch and power source.
All you need to do is mount or install the LED light strip to your desired location.
Step 3: Install the LED lights
Before installing the lights, check first if the lights are working properly.
After this, you can now mount the LED strip lights. Line the LED strips to your desired surface.
The adhesive in the LED lights makes it easy to mount.
Buy Online: RGB LED Strip Submersible IP68 5050 SIRS-E High Quality 30 LED Meter
9. Outdoor Lighting LED
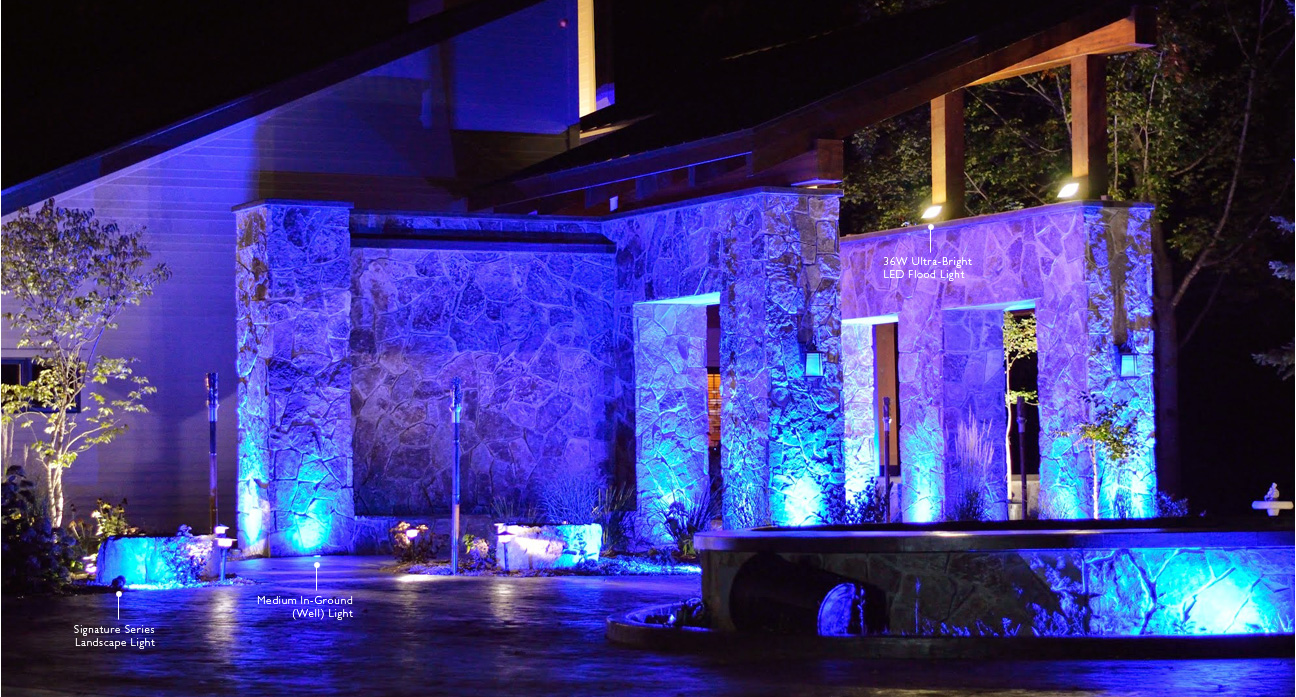
Image Source: aspect LED
Having high quality LED lighting for your home is an experience like no-other. It does take some skill and time to put together, but once it’s finished, you’ll be glad you did it.
Accent lighting in certain areas of your lawn makes you want to enjoy the outdoors even more.
LED Lighting does save energy compared to traditional lighting. It’s always something you don’t have to worry about changing every so often.
The LED lights are highly efficient and can even last up to 30,000 hours.
There are different kinds of outdoor lighting that you can choose from such as:
- LED deck lights
- Path lighting
- LED landscape spot and flood lights
- Pond and fountain LED lighting
- Outdoor LED light strips
If you want to install LED lighting in your outdoors, here are some steps you can follow.
Step 1: Decide what kind of LED lights
Before you go to the hardware or buy online, you should research first on the kinds of LED lighting you can use for the outdoors.
From the choices you have, pick the ones you want to be installed.
Step 2: Create a layout
To have a good idea of how and where you will install the outdoor LED lighting, it would be great to have a layout of your lawn area.
You will be able to put your LED lighting so that you can improve the overall aesthetics.
Deciding the location and height of the light pole is also part of the layout.
In general, you do not want to over light the outdoors.
Step 3: Purchase the materials
Of course the primary material you will need will be the LED lights you will install. But aside from this, it would be best to buy a large transformer that will be enough for your layout.
Remember to buy LED lights that can withstand the outdoors. Weatherproof LED lighting is highly suggested.
Step 4: LED Light Installation
When installing the outdoor lighting, layout all the fixtures first.
Organize the wires by using 10-gauge wires for the main lines and 12-gauge wires for the in-between lights.
Bury the wires at least 6 in. deep to prevent damage. The connectors that you will use must also be weatherproof.
The LED lights you install as path light should be straight.
Step 5: Install transformer
Install the transformer in a safe place near an outdoor GFCI outlet.
A transformer on a post will make it easy for you to change the photocell’s orientation.
This is where you will connect the 10-gauge main wires of your LED lights.
10. Nightclub Lights

Image Source: I-5 Design & Manufacturer
Lights at a nightclub – it is the single most integral component of their venue. Ask any nightclub owner and they will all tell you the same thing. Besides the sound, the lights alone can transform a down in the dumps nightclub to the hottest place to be in any location.
Beautiful lights, flashing lights, strobes – the ambience alone in addition to the sound will make you want to dance the night away.
It really will influence a club-goer and will affect your bottom line. Being able to set your nightclub apart from others is important.
You want your venue to have that “wow factor” that customers will always go back for.
LED lights is the best bulb to use for these color and various lighting effect. Aside from being power efficient, LED lights also occur in a variety of colors.
There are even ready-made LED lights complete with a control box that features strobe and blinking effects perfect for your night club.
Step 1: Color combination
The crucial decision when designing nightclub lights is the color you will use for the lighting. Every color has its own unique effect. A color that is not too bright and not too dull is what you want to aim for your nightclub.
Step 2: Purchase everything you need
You can scout and look for a variety of LED lights. Once you are decided, you should order the LED light you will use.
Step 3: Installations
The LED lighting of nightclubs is always indoors. Thus, no need for weatherproof LED lights. Most if not all of the LED lights will be installed indoors. It would be good if you already have pre-installed ceiling lights so that all you need to do is change the lights to colorful LED lights. If not, you can use LED strips to outline the stage or any part of your nightclub you want to draw attention.
Step 4: Connect the wires
Make sure that there is no electricity power prior and during installation to ensure safety. After that, you can now connect the wires and create an organized wiring system. Organizing the wires is very essential to prevent any possible fire hazard.
Buy Online: DMX LED Strip 34 Pixel/m RGB SIRS-E PixelDMX Controlled
11. Bridge Lighting Design
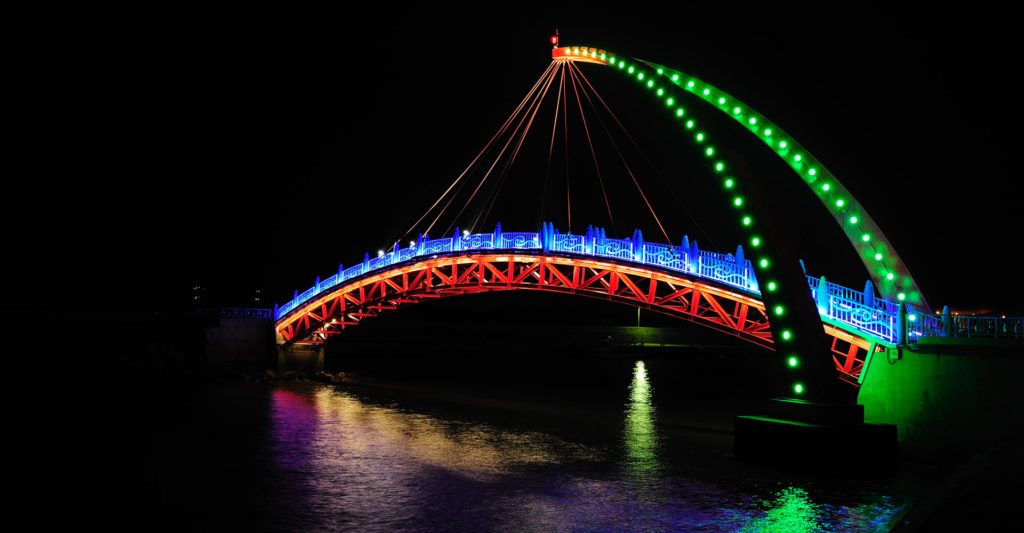
Image Source: Rooster Lighting
One of the last things you would think to integrate some LED lights into would be a bridge!
But yes, there are quite a few engineers who incorporate lighting designs into their projects. The main reason for this is usually for aesthetic value and easy recall.
Besides, it would not hurt to have extra light especially at night.
Most of all the bridge designs that you come across incorporate DMX controllers. The DMX controller allows you to program the effects of the lights so that it automatically loops.
The kind of light use for this purpose are mostly LED lights. LED lighting is known to use very small power compared to other kinds of light.
Because of this, designers are able to put together thousands of LED lights together just like what you see in bridge lighting designs.
The best lighting for bridge is the LED lighting strips because of its flexibility and versatility. The strips can be used to create different shapes suitable for outlining the bridge structure.
Step 1: Choose the bridge you want to design
Decide on which bridge you want to add lighting. Prior to purchasing the LED lights, it is best to create a draft of the design or light pattern you want to put on the chosen bridge.
By doing so, you will have a rough estimate of the length and quantity of LED lights needed.
Step 2: LED light strips
The most popular LED lighting for a bridge is the LED strips.
It comes in reels of very long length. It also has a line that allows you to cut the LED with ease. There are single color and multi color LED lighting strips that differ in the brightness of the color emitted.
Before installation, the effects of LED light
Step 3: Installation
The number one reason why most people prefer LED light strips especially for the outdoors is because of its very easy installation process.
All you need is a LED light strip built with adhesive. You can mount these LED strips anywhere you want as long as you have the power source you will need.
Just remember to choose the weatherproof LED light strip variety.
Step 4: Safety
Just like architectural lighting, lighting a bridge can be a difficult and daunting task.
To prevent any electric problems, it would be best to hire someone else to install and make sure that all lines are working perfectly.
Buy Online: RGBW LED Strip Submersible IP68 4 in 1 Neutral White SIRS-E A Grade High Quality
12. LED Lights for Shoes

Image Source: adafruit
What’s cooler than having some sneakers that light up with LED lights?
It’s literally the fashion trend as of right now and most teens and young adults are buying them like crazy. LED lights are very energy efficient.
But aside from that, they are also small enough to perfectly fit the sides of your shoes.
You can wear them anywhere, whether day or night. This little DIY will actually show you how to make your own with some sewing and soldering. Check out the guide – or if you’re not interested in making your own check out these from Amazon
Adding LED lights to your shoes is definitely a fun little project you should try. You can wear them anywhere, whether day or night.
This little DIY will actually show you how to make your own LED lighted pair of shoes.
Step 1: Prepare what you need
For a successful DIY LED lighting shoes, the first thing you will need is a Velostat.
A velostat is conductive material that is impregnated with carbon black. This is what makes your shoe light every time you step it.
You will also need LED strip lights and FLORA board.
The FLORA board is a wearable electronics that consists of a Arduino-compatible circuit board.
Step 2: LED test
Before attaching your shoe LED, you should test it first if it works.
What you need to do is tape a conductive material onto each side of your velostat forming a loop. One will go through the analog FLORA board and the other to the ground.
Now, attach your LED strips to the FLORA board and see if the lights up every time you step on the velostat.
If you have succeeded, you can now proceed to the next step.
Step 3: Mounting it on the shoe
Wear your shoes then bend your foot. Mount the part of your shoe that is most bent.
Skip this part when you are gluing the LED strips. Glue your LED strips and FLORA board using Permatex silicone adhesive.
Connect a battery pack to power your shoe LED lights.
To learn more about the details on how to make your own LED lights for your shoes, visit Adafruit.
13. LED Landscape Lighting
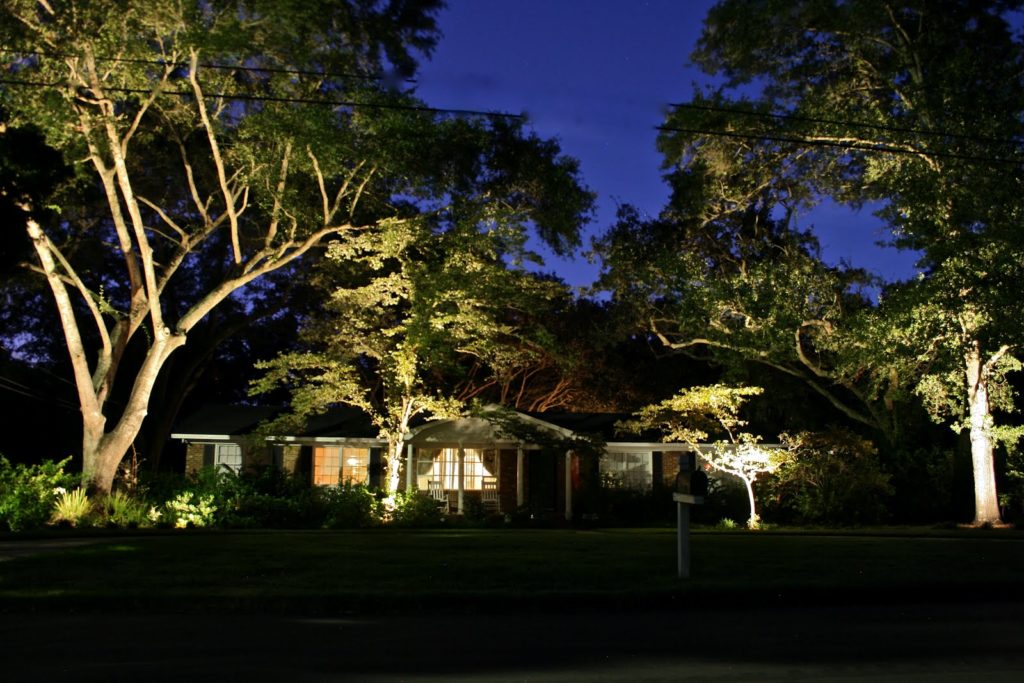
Image Source: Design Ideas & Decor
Landscape is one of the areas of your home that you want to look good. You can design well with good lighting.
You’re entire home will look amazing, both outdoor and indoor. The ambiance of your garden will really be different once you install lights.
Even at night, you will enjoy spending time in your garden.
The best way to light your landscape is by using LED lights.
It is the most dynamic kind of light because of its low energy requirement and relative small size. People are using LED lights in practically anywhere.
You can also use LED lights to add ambiance to your landscape. There are accent LED lighting that also has a dim effect perfect for garden setting.
Here are a few areas where you can implement lighting to enhance your home:
- Bushes
- Trees
- Pool
- Gazebo
- Stairs
- Columns
- Window Frame
- & much more
You can use LED lighting to provide the ambiance you want at a cheaper price. LED lights have now taken over the lighting industry because of its power efficiency.
There are now many kinds of LED lights that you can install in your garden to improve your landscape such as path lights, fountain lighting, hardscape lighting, LED string lights, step lights and a lot more.
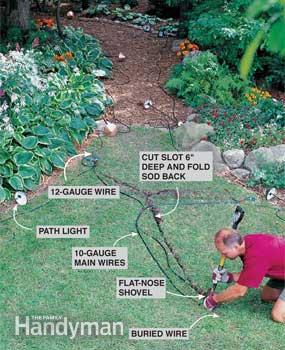
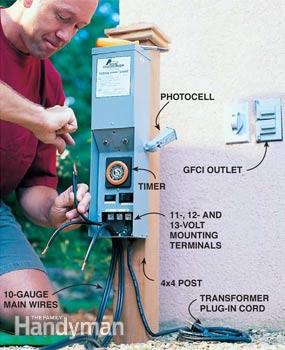
Here are the steps on how to install LED landscape lighting.
Step 1: Planning
When you want to upgrade your garden by adding lights, you should first make a plan before buying materials. Planning is essential to make sure your landscape better than before. It is important to have sketch of your lawn and indicate the areas you want to install LED lighting. Aside from the location, knowing the type of fixture you want to install will help. From the estimated amount of lighting you want, you will know the appropriate transformer that you should install.
Step 2: Buy the materials
Aside from the LED fixtures and cable wires, you will also need other tools such as voltmeter, wire cutter, pliers, screwdrivers, shovel, drill and others. Make sure to check that you have all the materials you need before proceeding with your project.
Step 3: Layout the cables
Before you start digging on the ground, it is a good habit to plan the cables you where you install your lights. Lay out all the cables and make sure they are organized. You can leave the cables as you start digging for your LED landscape installations.
Step 4: Digging
Start digging in places where you will bury the wires to install your LED light poles. Ideally, the wires should be buried about 6 inches from the ground. Remember to keep the other end of the wire sticking out of the soil to connect the LED lights.
Step 5: Wiring
After you have successfully buried the wires, you can now start connecting each of them. Every LED light has a different direction. Take note of the specific directions for particular LED lighting type. Make sure that the connectors are at least 2 inches underground. Once the wires have been connected, you can now work with the transformer. It is advised to place the transformer on a post near your home. Insert the wires in to their corresponding terminals. Lastly, check if the LED lights are working.
14. Benefits of LED Lighting in Schools
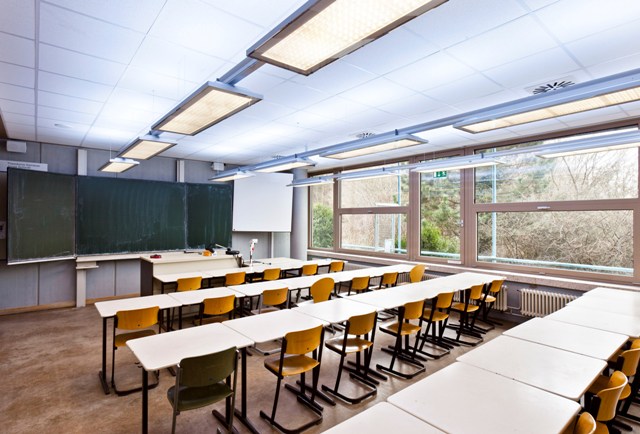
Image Source: LEDs Magazine
LED or light-emitting diode is becoming the most popular type of light.
The main reason for this is the lifespan of a LED light. In general, LED lighting can last an average of 50,000 hours (up to 100,000 hours) compared to the 2,000-6,000 hours of halogen bulbs.
Because of this, more people whether commercial or personal prefer to LED just like in schools.
The efficiency of LED lighting is what drives people to convert their existing fluorescent or halogen bulbs to LED.
Even schools are now converting to LED because of its benefits which include:
- Longer lifespan
- Low power consumption
- No start up current
- Better efficiency
- No toxic substances
- Environment friendly
If you plan to change your lighting to LED, here is the step by step guide.
Step 1: Learn more about LED light
If you want to change your lighting at school to LED light, the first thing you have to do is learn more about LED bulb.
Make sure to know the kind of light socket your school has. Once you know this, you can head to the nearest hardware and buy a LED bulb.
There are different types of LED bulbs depending on bulb shape, base size and color. The bulb shape and base size varies depending on your preference or budget.
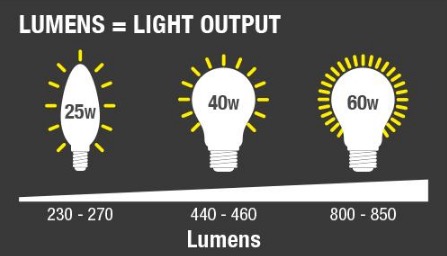
The measure of LED brightness is in lumens. A high lumen value means brighter light.
An 800 lumen LED bulb produces the same amount of light as the 60-watt light bulb.
If you will use the bulb for school purposes, it is advised that you purchase the white color bulb which is great for reading.
Step 2: Purchase the LED bulb
After deciding the kind of LED bulb you will use for replacement, the next step is to purchase the LED bulb.
Step 3: Installation of the new LED bulb
Since you are replacing the lights, there is no need for new fixtures for the school.
What you can do is convert the existing bulbs to LED bulb. The installation of a LED bulb is very easy.
Unbox the bulb then mount the LED bulb onto the bulb bases.
Buy Online: LED Fluorescent Retrofit Kit UL Listed Class 2
15. LED Church Lighting
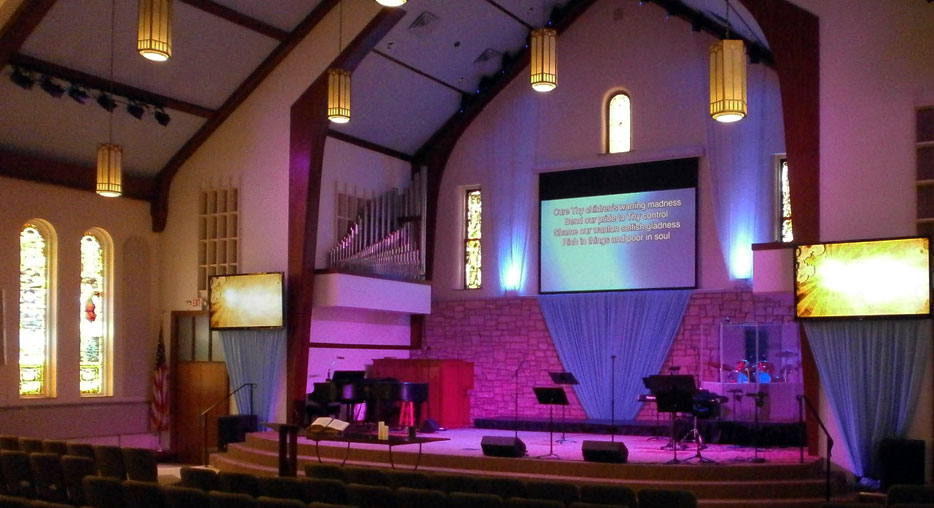
Image Source: Designer PUB
LED is taking the world by storm. Because of its efficiency, more people are now converting their personal lights at home into LED lighting.
Even the church is upgrading their lighting by using LED lights.
LED light is a lot better because of its ability to outlast the other types of bulb in terms life span in efficiency.
At first, it may seem that LED lighting is more expensive.
But when you calculate in the long run, you will understand that you actually save more money because you do not have to change light bulbs everyone and then.
The LED lighting inside a church makes it more appealing to the people. In the same way, the LED lights are enhancing the architecture of churches.
If you plan to change or install a new LED lighting, follow this important steps.
Step 1: Count the lights to be changed
There is no doubt that there are a lot of lights installed inside the church. If you want to change to LED lights, you should know how much bulbs you will have to pay.
Step 2: Make some research
It is best if you can know the kind of LED light you want to buy for the church. This will save you a lot of time since there are too many LED types.
Usually, lights from the church are in dirty color for that added ambiance.
Step 3: Buy the bulbs needed
If you did you research, you will know exactly the LED bulb model you prefer.
By doing so, you are actually saving a lot of time.
Step 4: Install the new LED church lights
After you purchase the bulbs, you can now install it inside the church as a replacement of the old lighting.
Installing the LED lights is as easy as plugging in the bulb onto the bulb base.
Buy Online: RGB LED Strip 5050 SIRS-E High Quality IP40 30 LED Meter
16. LED Stage Lighting

Image Source: LEDS Magazine
One of the important uses of lighting is for the stage. Everything that happens on the stage is enhanced by the lights present.
Depending on the show, they can decide to convert the old stage lights to the new trend of LED lights.
Probably the best reason to change light preference is due to the cheaper option. But aside from that, LED lighting is also environmental friendly.
The benefits of LED lighting is limitless. It is for this very reason that everyone is changing to LED lights.
Here are some options for the kind of LED light you can use in a stage.
- LED flood lights
- LED spotlight
- LED strips
- LED auxiliary work lights
In changing the LED stage lights, here are some of the steps:
Step 1: Check the type of bulbs and lighting you have
The lighting present in a stage has its own purpose. They have different characteristics depending on how it is used.
Usually stage lighting has a spotlight to focus the light on spot on stage. The flood lights are used for a greater area.
Then there are dim lights for a different vibe or feel. Sometimes there are also lights of different colors.
Step 2: Find the LED counterpart
If you want to convert the stage lights to LED, you should be able to look for a counterpart for each of the light.
In this way, you will still be able to utilize the different effects of the lights on stage.
You do not have to worry because LED lights also have a wide array of light types depending on the brightness and color.
Step 3: Installation
Once you are able to find the LED counterpart, the next thing you do is install the lights.
Most if not all of the LED lights can be easily plugged in.
17. Bathroom LED Lighting Ideas
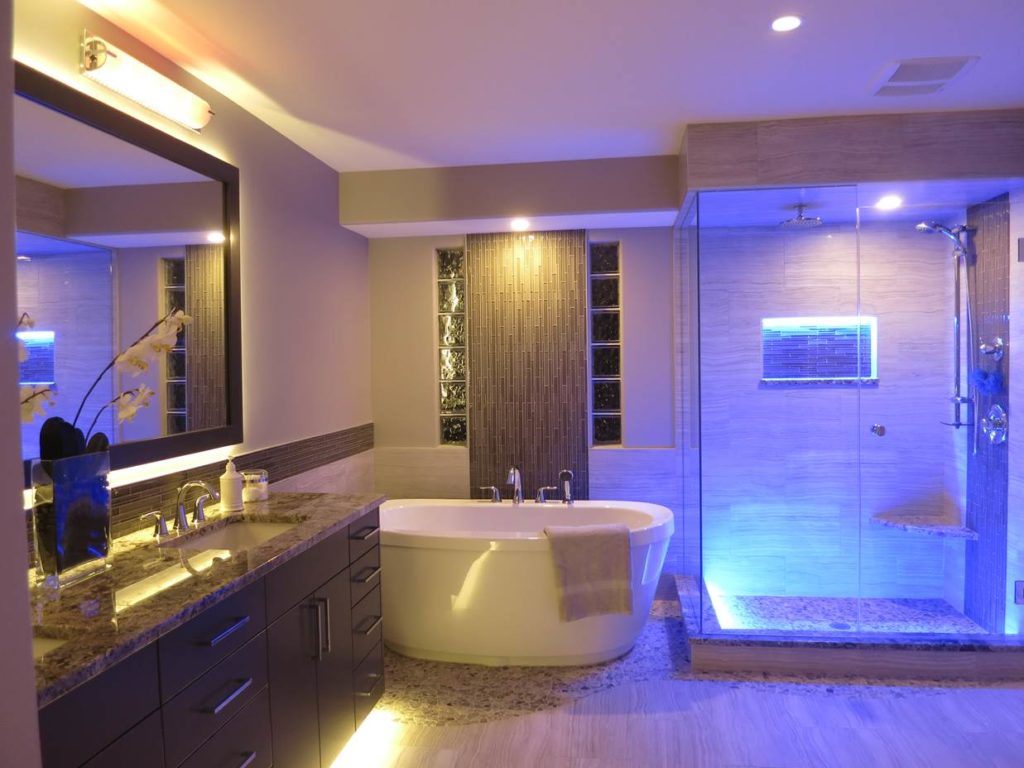
Image Source: Bath Decor
With respect to other parts of the house, the bathroom is usually overlooked when it comes to lighting.
For some, all you need is any kind of light in the bathroom. Luckily, we now have LED lights that makes affordable to install lights even in your bathroom.
Come to think of it, the bathroom is where we clean ourselves and face the mirror often. Because of this, I think it is best to give it the best kind lighting you have.
The most important purpose of a good bathroom lighting is to keep your bathroom look bright and clean.
A dull bathroom lighting can lead to a dirty bathroom simply because you cannot see the scum.
LED has the ability to provide bright white lights while using less energy. This LED lights is the ideal lighting for your bathroom.
A good bathroom consists of different layers of LED lighting. Most of the time, bathrooms have a mixture of a large white light with accents of yellow hue.
You can achieve this look by following these steps.
Step 1: Plan your lighting
Finalize the plan of your bathroom including the number of light, color and features you want to include.
You can opt for a dim LED light if you want or stick to the usual. A good lighting may consist of both white and yellow lights.
Draft the location of your lights on to your bathroom.
Step 2: Shopping for LED lights
After you have decided the kind and color of light you want to put in your bathroom, you should then visit the store and see for yourself the different color shades you can choose from.
You can experiment with some colors to add some fun in your bathroom.
Step 3: Install the LED lights
If you bathroom is pre-existing already they you would not have any problem with the base sizes and installation part.
Technically all you need to do is screw the new LED bulbs to your pre-existing bulb base.
If your bathroom is still being done, then you might as well contact an electrician to help you with the layout of wires and switches.
Buy Online: RGB LED Strip Submersible IP68 5050 SIRS-E High Quality 30 LED Meter
18. Garage LED Lighting
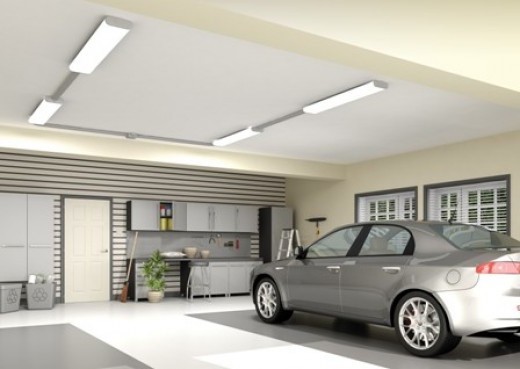
Image Source: EverLight
The garage is probably one of the least important places in your house that you would spend much money on lighting.
As such, the ideal kind of light for your garage is a LED light. LED lighting is very common nowadays because of its cheaper long term cost.
You are saving money using LED because each LED bulb can withstand a lot more hours compared to the other kinds of bulbs.
Here are some LED light options you have for your garage:
- LED wall packs
- LED panel lights
- LED high bay lighting
- LED linear lighting
- LED flood lights
Even installation of LED lights is very simple.
Step 1: Plan ahead
To make your life easier, the best thing to do when making house is to make space for the wiring of your lights.
There are incidents when people forget to consider the wires of their LED lights that they end up having trouble upgrading or installing new LED lights.
Step 2: Choose the type of LED
After planning, you must start to pick the type of light you want to be installed in your garage.
A bright, white light is what you need for your garage. This will be ideal especially if you use your garage also as a storage space.
The brightness of the LED lights depend on its lumen. A higher lumen means a brighter LED light.
Step 3: Install your garage LED lighting
The installation process of your LED lighting highly depends on the kind of LED light you chose.
LED bulbs are usually installed by screwing the bulb to the bulb base. If you prefer linear lighting, you will have to install the whole light fixture on your ceiling.
LED strip lights are fairly easy to install but these serve more as an accent light rather than a bright light.
Buy Online: LED Fluorescent Retrofit Kit UL Listed Class 2
Versatile Lighting
The true value of LED lighting is the ability for use in almost any place, nook or cranny, and provide you with versatile options. LED strips could be tacked on to vehicles or under kitchen cupboards, LED bulbs can be used in any regular sockets, and these use low power and do not generate heat. Comparisons with other technologies show that LED lighting is the way to go in the future, because of its benefits and savings for the consumer.
The above list of uses could be extended further, and its uses are limited only by your imagination.
Let us know in the comments below what type of LED Lighting project you’re working on!