Contents
How to Solder LED Strips!
Applies to 5050 & 3528
Plug and play connectors and couplers may seem like the best way to join LED Strips together for an installation, but there is actually an alternative that’s even better. A more efficient way to finish your installation is to solder everything together. Instead of using the connectors and couplers that we have to offer for a big installation, we recommend that you solder everything into place.
Why Solder instead of Using Couplers?
We recommend soldering your LED Strips instead of using our couplers for larger installations because although it may be a bit laborious and time consuming, the end result is having the peace of mind that everything is not going to budge.
The last thing you want to worry about on the night of a big show or grand opening is the stability of your lighting installation. Couplers also called connectors are great for smaller applications, but if you’re working on something that you need to last a long time, soldering is the way to go.
Soldering Basics & Materials
If you don’t have any soldering experience, I’d recommend you learn the basics and practice using pieces. I wouldn’t recommend starting off by soldering pieces of cable together, or by making a set of XLR cables before you start soldering your LED Strips.
There’s not much room for error on the PCB board of the LED Strip itself, getting it right the first time will spare you a lot of time and hassle.
You’ll need:
- Good quality soldering iron, or soldering station – although they sell them everywhere, finding a good quality soldering iron is very important because of the heat dispersion throughout the iron. Ask a lot of questions and pay attention to product reviews if they’re available. Some don’t even have enough heat output to melt your solder!
- Wire Cutters – they will be used to strip about 2 -3 mm of the insulation off of the end and expose the bare copper wire.
- Solder– this is what holds the sections of LED Strips together.
- A clean workspace– it’s really important to have a clean workspace that is free of debris that could get onto the light strips or wire.
- A somewhat heavy item – use this to hold down your LED Strip flat onto your work bench.
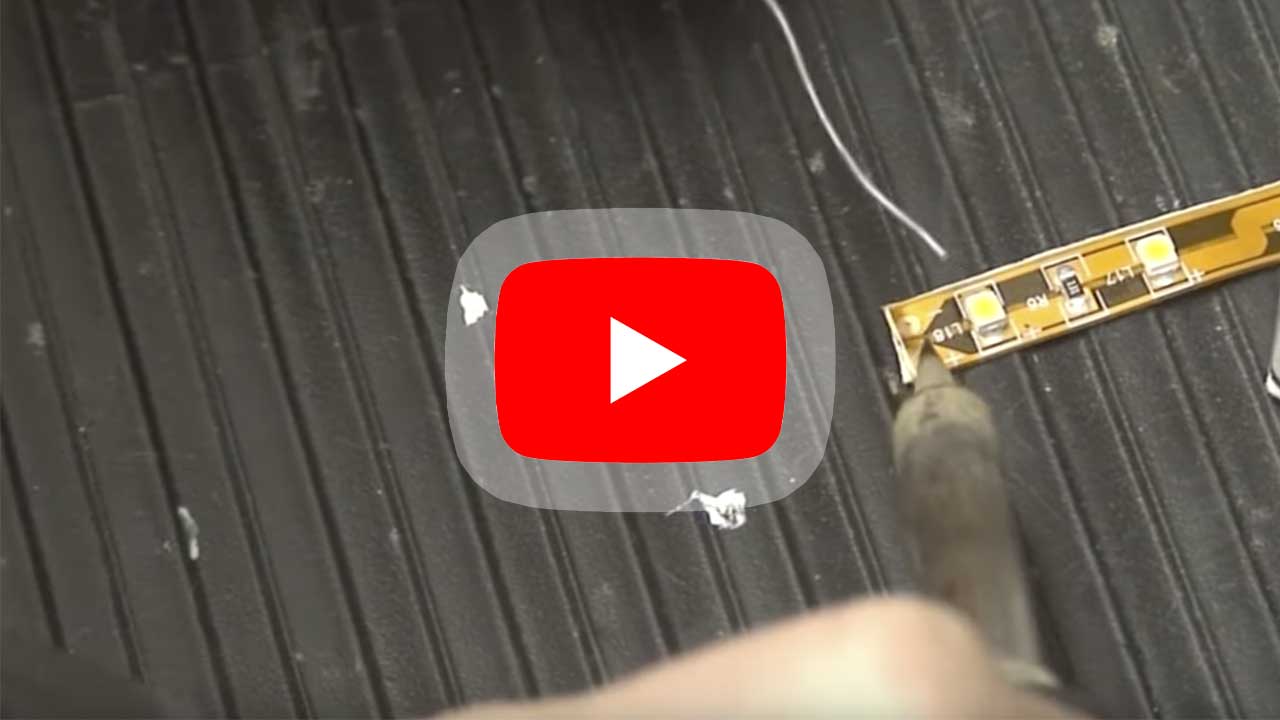
Getting Started: Soldering Leads Onto LED Strips
After getting together all of the items needed to solder your LED Strips together with leads
- Strip off about 2-3mm leaving the copper on your wires exposed.
- Apply heat and solder simultaneously to the bare copper making sure that you don’t apply too much heat.
- Dab off solder onto the bare copper pads on the strip. You do this by applying heat and solder simultaneously, be careful not to apply too much heat. A good rule of thumb to avoid applying excess heat onto your materials is to count two full seconds then taking the soldering iron off.
- Let them cool off.
- Place the tinned end of the wire leads and apply heat to the wire while placing it over the dabbed soldered end of the copper pad on your LED Strip.
- Once it melts fully take off the heat and hold it in place until it cools off and solidifies again.
- Repeat the process with the rest of the wires on the lead until finished.
Soldering Two Pieces of LED Strip Together
To solder two pieces of LED Strip together, you will repeat the process of dabbing solder onto your LED Strip’s copper pads. Do that to both of the ends that you wish to join. Once both ends have been tinned, cut off a bit of the strip to expose the solder bead just enough so that both tinned sections can make contact.
Verify the polarity and align both pieces of the LED strip before applying heat to the tinned section and then dragging the molten solder over to the adjacent bead. This is much easier if both sections of LED Strip have previously been tinned. If you can master soldering LED Strips you can learn how to solder virtually anything because this isn’t a simple task. Hopefully you have learned what is required to make your next installation easier.
If you don’t feel that soldering the LED Strips together is right for you, check out our selection of couplers here.


Leave A Comment
You must be logged in to post a comment.